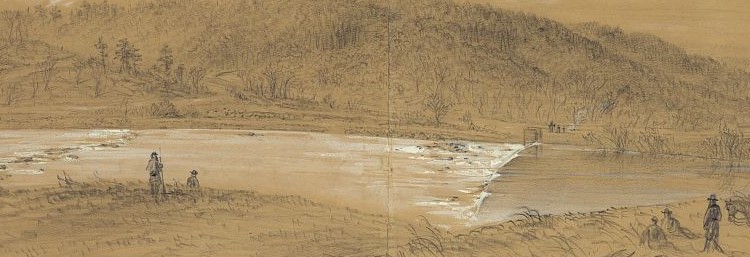
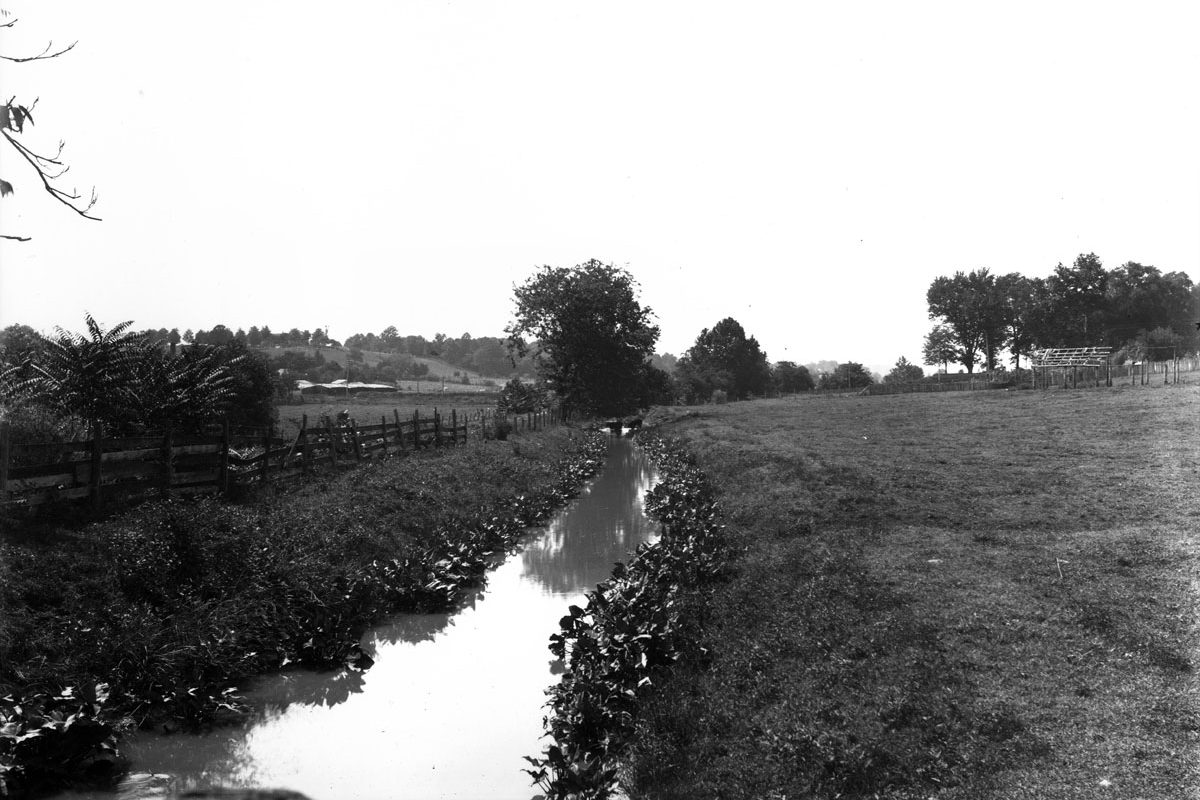
Taylor’s Dam on the Rappahannock
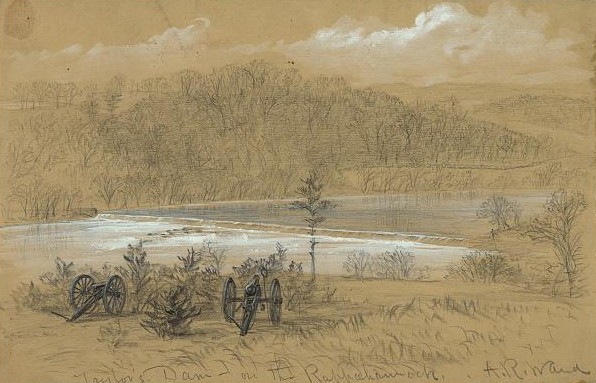
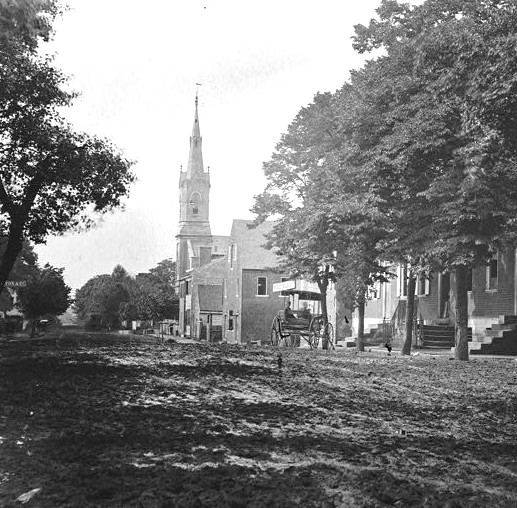
Sometime in early 1863, Alfred R. Waud sketched Taylor’s Dam from the north side of the Rappahannock River. This stone and timber river barrier was a component of the Rappahannock Navigation, a system of canals. locks, and dams that reached 55 miles upstream to Fauquier County. Construction had begun in 1829 at a turning basin in Fredericksburg. When completed in 1849, the system consisted of 15 miles of canal and 32 lift locks. The other 40 miles of navigation were in the river channel, across slack water ponds behind a series of 20 dams.
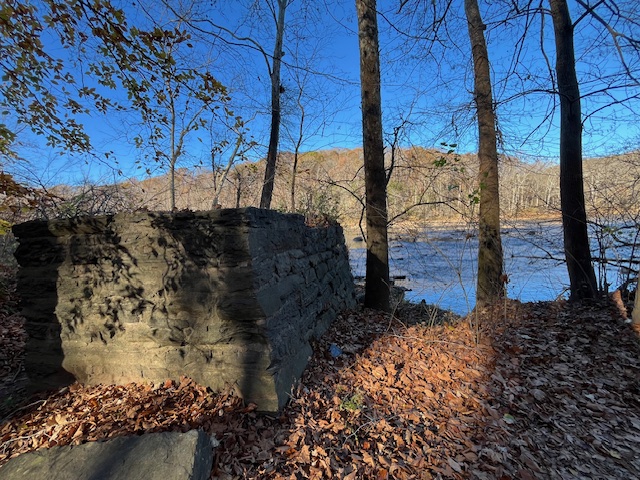
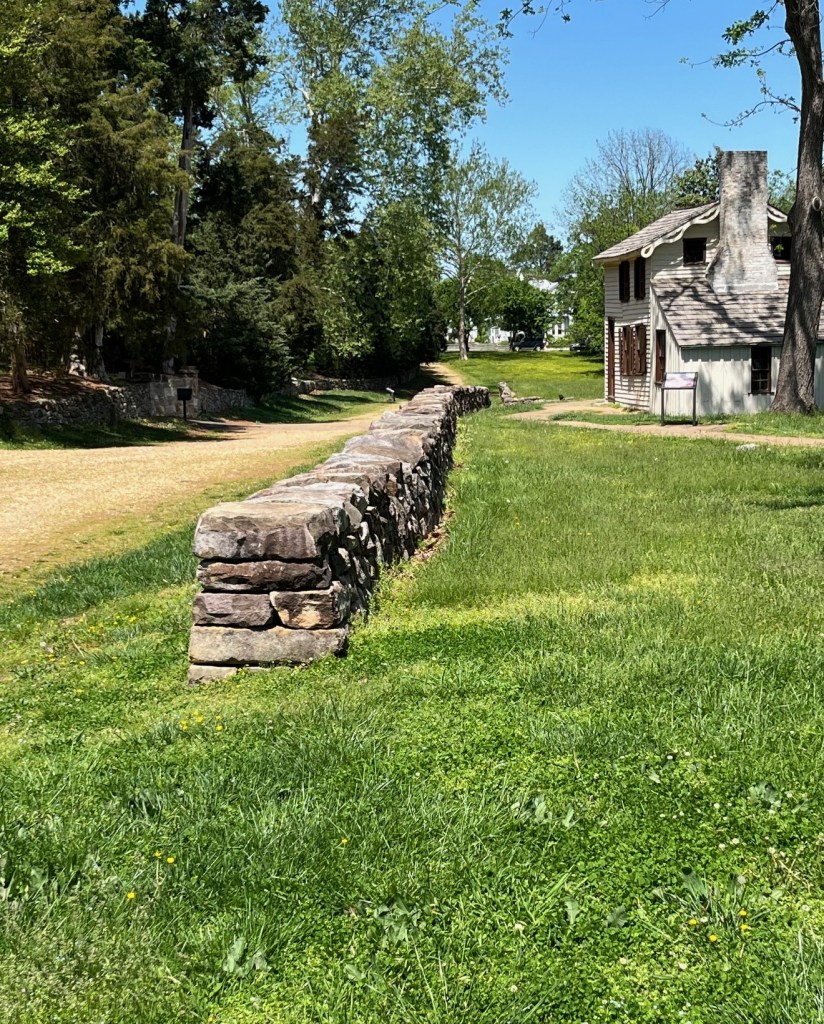
Taylor’s Lock, visible in the sketch on the far shore, was at the head of the canal that extended three miles downstream to the Fredericksburg turning basin. This first canal section provided for navigation around the rapids and rocky sections of the river’s fall line. This solidly built canal lock anchored the dam on the south shore. A substantial stone abutment anchored its north end on the Stafford shore.
The Rappahannock Navigation had been built on the promise of a local gold industry, but its completion coincided with the California gold strikes. The western gold deposits dwarfed the Piedmont deposits and Rappahannock mining became too much effort for too little gold. As an example, the US Mint received $5.5 million from the California gold fields in 1849 compared to only $129,382 in Virginia gold. Mining in the Rappahannock valley diminished substantially but its abandoned mining pits and trenches, as well as the related canals and dams were part of the Civil War landscape.

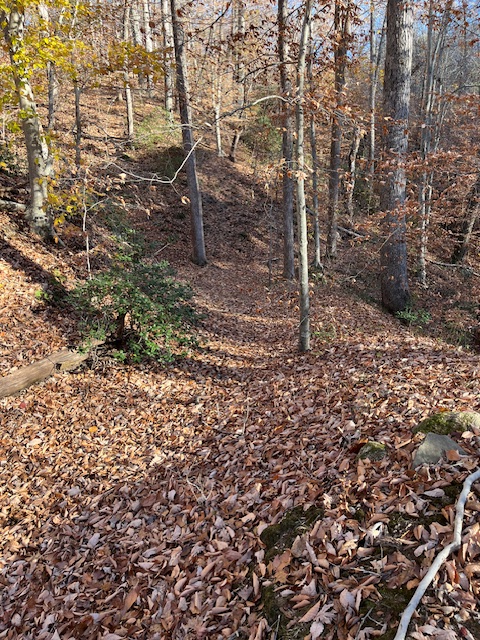
The carefully constructed granite walls of Taylor’s Lock have stood for nearly two centuries. It was the second lock along the canal that extended back to Fredericksburg. The first lock (in the vicinity of Interstate-95) raised and lowered canal boats 12 feet. This lock raised and lowered boats seven feet, linking the canal to the instream reservoir backed up by Taylor’s Dam. Lock 3 and the next section of canal lay across the slack water pond 0.9 miles away on the Stafford shore.
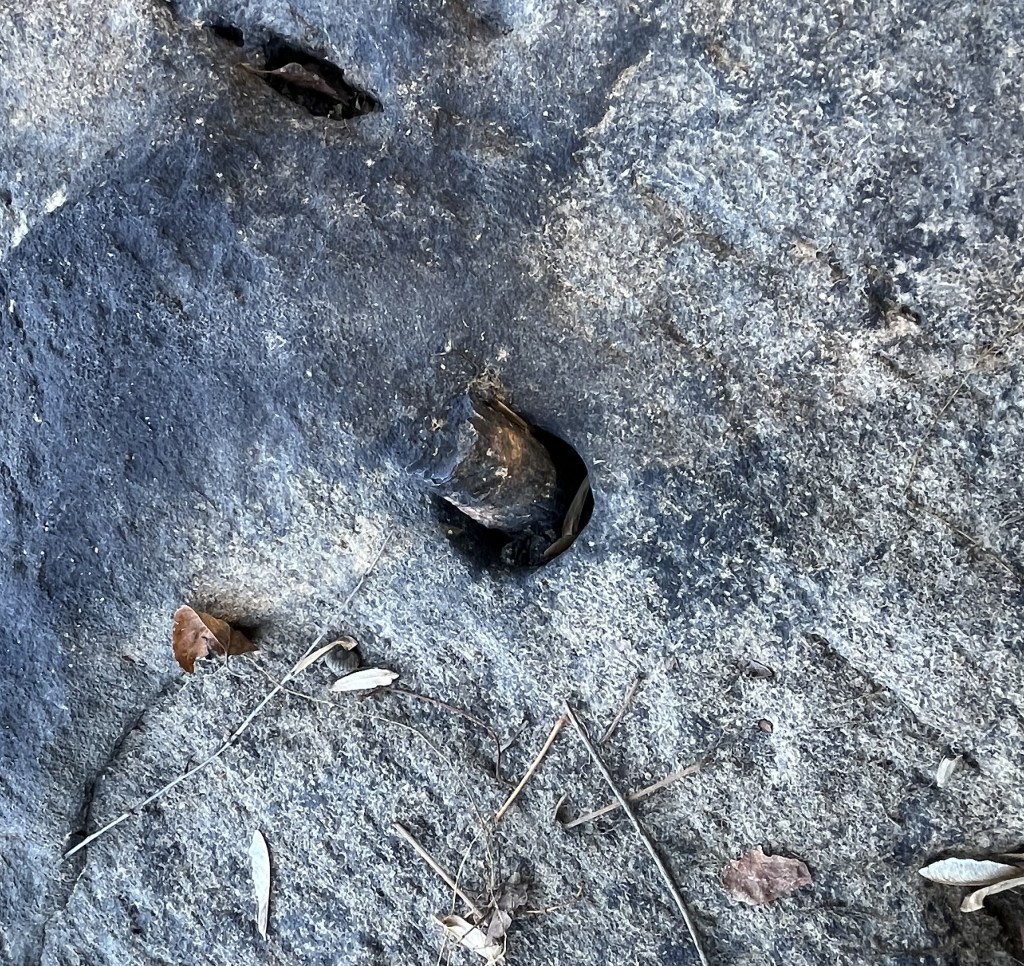
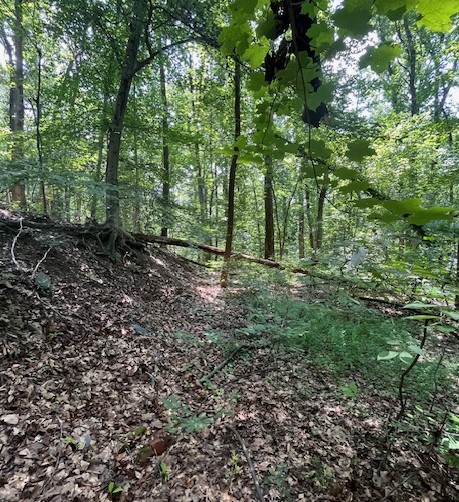
The wood frames of the river dams deteriorated long ago and the stones have become whitewater obstacles for canoeists. Some of the old timbers are visible under the water because the lack of oxygen has kept the wood from microbial degradation. The iron spikes that anchored the dam to bedrock are also visible. Most of them broke off over the years, leaving just an iron remnant in a hole. In some instances, though, the entire spike can be seen, usually bent over by trees and other heavy debris that banged against them over the years.

An intact iron spike just beneath the surface.
A broken off iron spike.
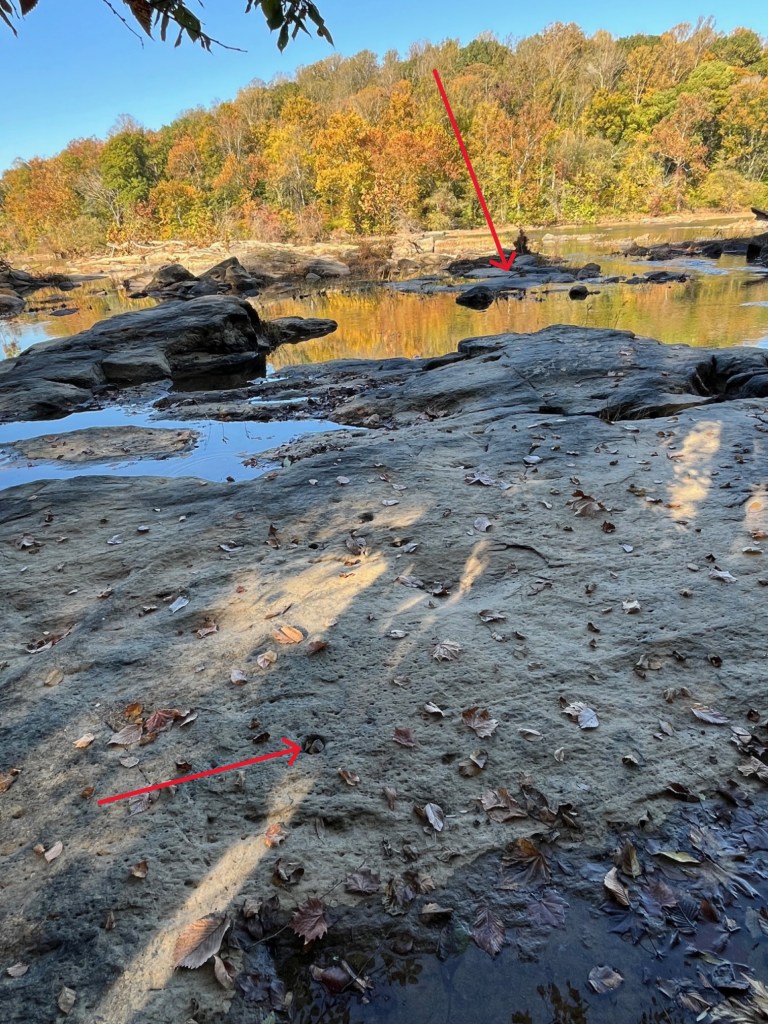
Taylor’s Dam angled across the river. Holes with broken spikes (lower arrow), a couple of intact but bent over spikes (upper arrow), and a stone abutment in the trees on the opposite shore reveal its exact location.
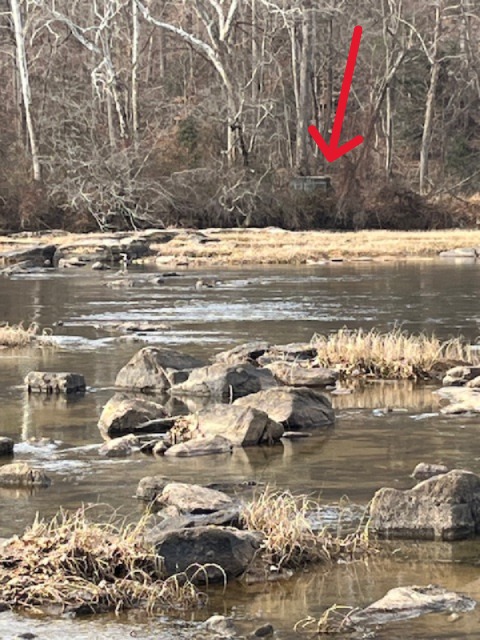
The stone dam abutment on the north side of the river becomes slightly visible in the winter months, when the leaves are down.
Taylor’s Dam created conditions that Union engineers had not anticipated when they constructed pontoon bridges for the Sixth Corps at Banks’ Ford. During the fighting at Salem Church, Henry W. Benham’s engineers put down a pontoon bridge at Scott’s Mill, just downstream from Banks’ Ford. A standard bridge train had 22 pontoons, and the Federal bridgebuilders used 14 of them. A second bridge train awaited instructions to lay down another span, but orders came from army headquarters at Chancellorsville to provide a third bridge at the US Ford crossing.
When those orders came, Benham knew a second bridge would still be needed at Banks’ Ford. He held back 6 of the 22 pontoons when that second bridge train departed for US Ford, reasonably certain that 16 boats would be sufficient for the additional bridge at US Ford, several miles upstream. He anticipated that those six boats held back, added to the eight boats left over from the first bridge, would be sufficient for the second bridge at Banks’ Ford. The topography at Scott’s Mill was not conducive for a second span in that same vicinity, but the engineers found a place downstream to where a break in the river bluffs allowed the necessary access to and from the river.
On May 4, Federal engineers began work to get the second pontoon bridge down and quickly realized they were going to be a few boats short. Their construction site was at the upper end of the slack water pond backed up by Taylor’s Dam. That reservoir made the river wider than what they had encountered at Scott’s Mill, and the engineers spent much of the day cutting down trees and building an abutment that would fill the gap between the last available pontoon and the south shore of the river.
A fuller discussion of these events can be found on pages 170 and 212.
Scott’s Mill and Ferry

Scott’s Mill stood just over a mile upstream from Taylor’s Dam and this scene is the second that Alfred R. Waud sketched in early 1863 from the north side of the Rappahannock River. The ferry landing was to the left of the mill and anchored a pontoon bridge that Federal engineers established on May 3 for the Union Sixth Corps, then fighting at Salem Church.

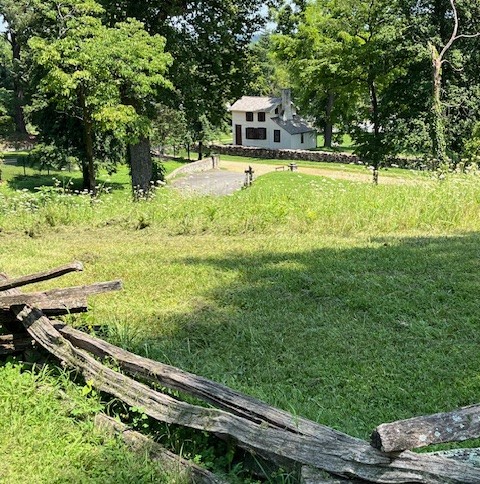
The site of Scott’s Mill as seen in January 2026. The stone foundation is all that remains of the wartime structure. The Rappahannock Navigation Canal is slightly upstream (to the right) and the ferry landing is just downstream (to the left). This photo was taken from the road that led to and from the ferry.

A closer look at the stone foundation of Scott’s Mill.

Lock 2 of the Rappahannock Navigation Canal, which boats accessed from the slack water pond backed up by Taylor’s Dam. This section of the navigation system took boats around the rocky shallow of Banks’ Ford.
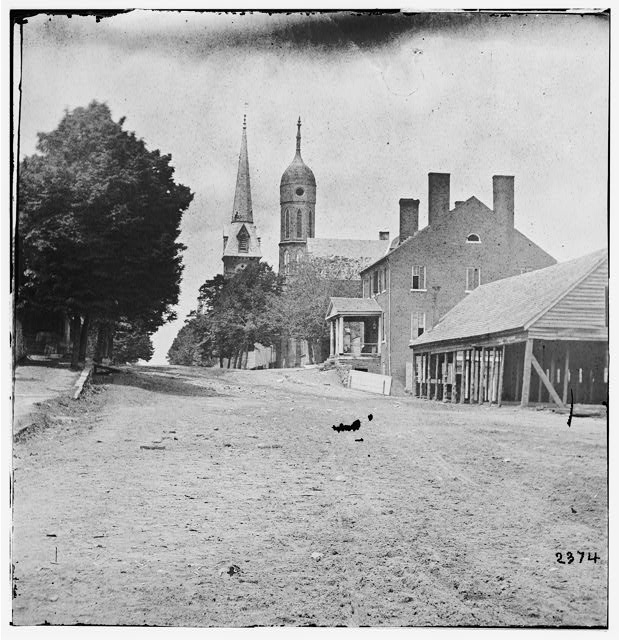
Banks’ Ford
This image of Banks’ Ford is the third drawing sketched by Alfred R. Waud from the north side of the Rappahannock River in early 1863.
Of interest in the detail of the road from the uplands to the river, seen angling across the slope in the upper left. Also of note is Banks’ Dam, a part of the Rappahannock Navigation System. Banks’ Dam backed up an instream reservoir that fed into a canal on the Stafford (north) side of the river. The canal is not visible in this image, but it extended downstream (to the left), through Locks 3 and 2, and spilled back into the river just upstream of Scott’s Mill
The Old Banks’ Ford Road
The historic Banks’ Ford road extends uphill from River Road before dropping down toward the river crossing, as seen in the sketch.

The Banks’ Ford Road extended up over the brow of the hill before dropping back down to the river.

Once over the hill, the Banks’ Ford Road continues toward the river. As seen in the sketch, the old road had been built to handle a standard size wagon. Erosion has since reduced the roadway width, but it still remains a vivid presence. There is a sharp hairpin turn at the bottom of the hill, to get the road on to the floodplain and headed toward the ford. Routine river flooding has obliterated the historic road below that turn.
Banks’ Dam Abutment
The abutment for Banks’ Dam is constructed of granite blocks and remains intact on the south side of the river. Alfred Waud’s sketch of this feature was done from the hilltop across the way. The abutment on the north side of the river is a canal lock, to be discussed in a future post.
Banks’ Dam created a slack water pond that fed water into a section of canal on the north side of the river that extended downstream to Scott’s Mill.
Smith Run – May 4, 1863
The Fighting East of Smith Run
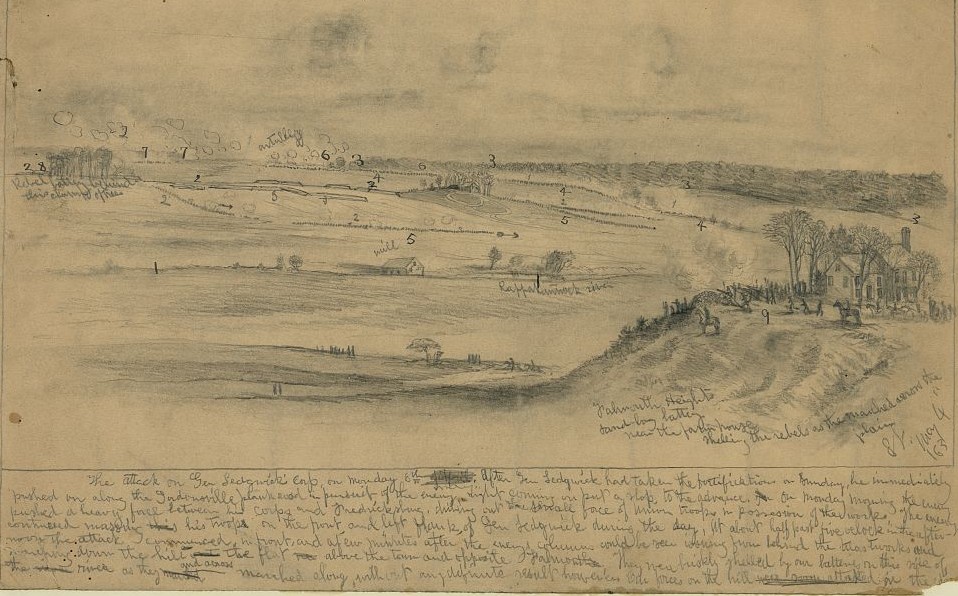
This sketch by Edwin Forbes captures the fighting along Smith Run on May 4, 1863. The battery in the right foreground (#9) is on the high ground above Falmouth. The building adjacent to the artillery is a two-story house called Clearview, which still stands. The Rappahannock River (#1) runs through the center of the image. The two mills are on the south side of that waterway. The structure on the right (above the Rappahannock River label) is the Bridgewater Mill, a cotton mill at the time of the war. The mill on the left (under #5) is what was called the Woolen Mill, which was also a textile factory. There was a third mill within that industrial area, but it stood closer to the river and was apparently hidden from the artist’s view by the intervening terrain.
Between the two visible mills and farther into the image is a building surrounded by trees. That structure is a handsome brick home called Snowden, then occupied by the Stansbury family.
The home sustained considerable fire damage in 1926 but the owners carefully rebuilt it in the same ante-bellum style. It now serves as administrative offices for Fredericksburg’s health care corporation. To the left of the house are earthworks (#4) which is now the University of Mary Washington campus. Only a few remnants of those fortifications survive.
The battle action is shown through various columns and lines of battle. Union Sixth Corps troops (#3) are shown on a range of hills on the east side of Smith Run, an area where modern Cowan Boulevard has been built. Union artillery (#6) occupies high ground on the west side of Smith Run. Two Confederate brigades (#4) are attacking the Union position, while Confederate artillery (#2, #8) fires from the hills behind Fredericksburg. During this attack, another Confederate brigade (#2, #5) is moving north to get around the Union flank.
Note the small arrows showing the battle lines (#4) moving toward the Federals (#3) and other arrows showing the Confederates columns (#2, #5) moving across the terrain toward the Union left.

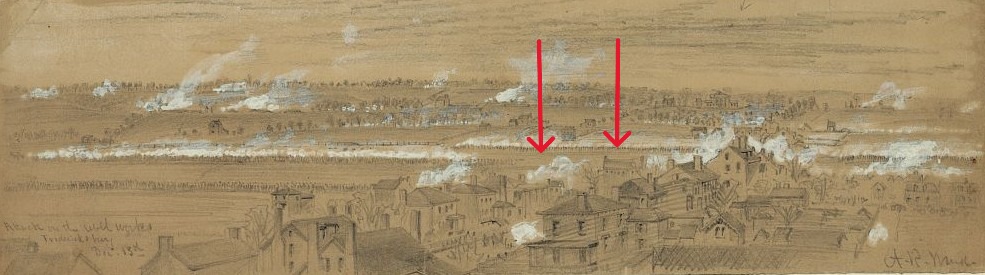
Trees and modern development have obscured the landscape depicted in Forbes’s wartime sketch. This modern photo, taken with a drone, allows us to see what remains. The house on the left is called Clearview. It was built c. 1796 and has an addition that dates to c. 1814. In the Forbes sketch, it is the house in the right foreground. Across the Rappahannock River are two additional features. Under the arrow on the right is the Stansbury house (Snowden), which is roughly in the middle of the wartime sketch. The middle arrow points to Confederate artillery positions shown in the upper left corner of the sketch, an area now occupied by the University of Mary Washington.
The Fighting West of Smith Run

Painting by Julian A. Scott called “Vermont Division at the Battle of Chancellorsville.” It depicts Vermont Brigade units engaged on the high ground west of Smith Run. Scott was a member of the 3rd Vermont Regiment and this image shows that unit rushing to get into position on the left of the 6th Vermont whose line of battle is enveloped in smoke. The time is late afternoon on May 4.
The William Street Assault
The Second Battle of Fredericksburg unfolded on a broad front and included two columns advancing out of town on William and Hanover Streets. The William Street column consisted of two regiments from Colonel Hiram Burnham’s Light Division, the 43rd New York and the 61st Pennsylvania, and the 82nd Pennsylvania and 67th New York from Colonel Alexander Shaler’s brigade of Major General John Newton’s division. Colonel Shaler was in overall command of the William Street column and accompanied it into battle.
These roadways are modern infrastructure, and buildings and trees block wartime vistas, but there are many components of the landscape that witnessed those events.

Intersection of William and Princess Anne Streets – in 2025 and 1864. View is looking west toward the Fredericksburg Baptist Church.

The 300 block of William Street, in 2025 and in 1864. The Federal assault column filed out of Princess Anne Street and began its advance here. The red awning on the right side of the modern photo is the same awning in the photo above it.

When the Federals turned up William Street, the 61st Pennsylvania Infantry led the way. The troops advanced at the double quick, in column of fours (four men abreast). Men in the front ranks had an unobstructed view of their avenue of advance and the Confederate-held heights directly in front of them, three quarters of a mile away.
Directly behind the 61st was the 43rd New York, followed by the 67th New York and the 82nd Pennsylvania.

The intersection of William and Charles Streets, looking south along Charles Street. The open area under tree cover was a local cemetery in 1863. The assault troops could see the Hanover Street column two blocks away to their left,
Prince Edward Street crosses William Street just past the cemetery noted above. That street constituted a rough urban edge in 1863. The dense blocks thinned out and there were only scattered buildings ahead. The Confederate position was still 1,150 yards away.

The gray building on the left is a Civil War structure. There were wagon yards and stables on the right. The attackers still had 1,000 yards to go.

The Fredericksburg Cemetery, established in 1844, is on the right. The road cut dates to the Ante Bellum period but was not then faced with brick. A canal drainage (Marye’s Canal) flowed right to left at the bottom of the hill. The Federals began to take fire in this vicinity.
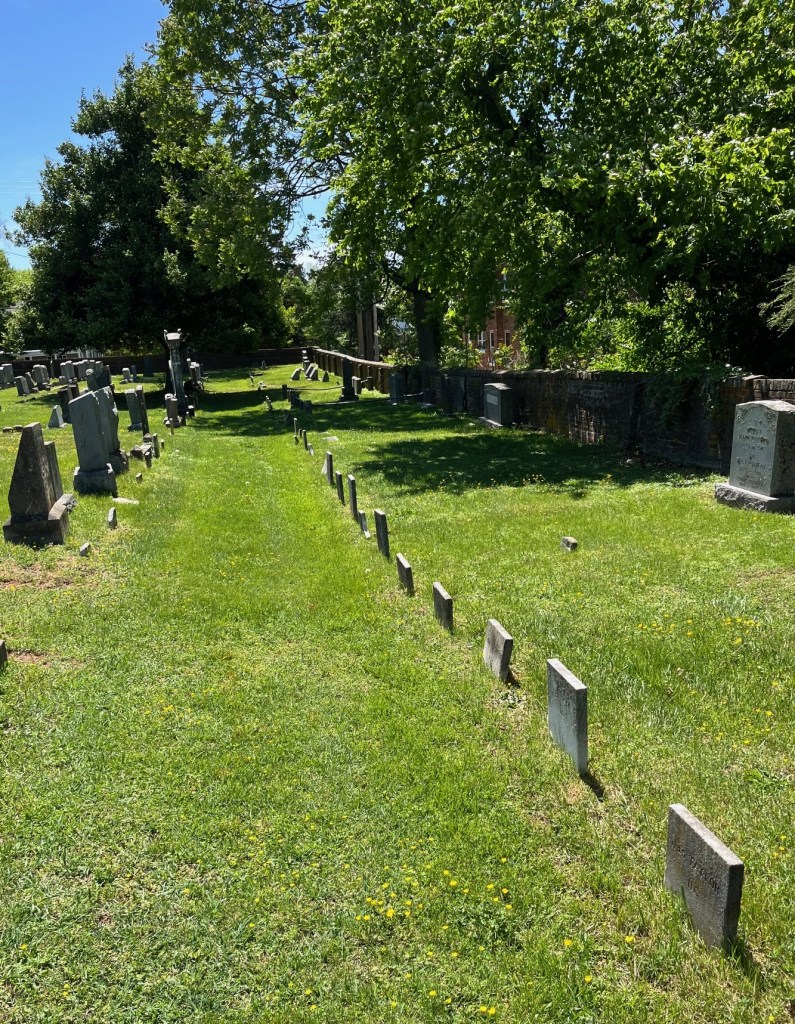
Federal skirmishers were inside the cemetery, protected by its brick perimeter wall

Modern Kenmore Avenue covers the old canal drainage. There was an intact wooden bridge across the waterway that could handle a standard wagon. The Confederate held heights were still 650 yards away.
The image below is a post-war photo. It was taken farther upstream but shows the characteristics of the drainage ditch.

Across the canal bridge and to the left was a large tannery, located where the gable ended buildings now stand. That industrial complex was owned by local businessman John Hurkamp, whose house on Hanover Street was then in use as John Sedgwick’s headquarters.
William Street cuts into the hill. As the assault column closed in, the troops became sheltered from the flanking fire that had bedeviled them since they crossed the canal drainage. The buildings on the left approximate the topography at the time of the battle.
The Confederate gun pit with William Street in its field of fire is on the University of Mary Washington campus. The Washington Artillery, from New Orleans, had positioned a 12-pounder Napoleon there, but it had been pulled away before the assault, which kept the Federal assault column from being blown to oblivion.

View of William Street from the Confederate perspective. The gun pit noted above is to the left.
The Hanover Street Assault
Two assault columns came out of Fredericksburg on May 3. Four regiments advanced up William Street, as described above. Two regiments came out of town by way of Hanover Street. Those units were the 7th Massachusetts and the 36th New York, of Colonel William Browne’s brigade, which was a part of Major General John Newton’s division.
As is the case on William Street, buildings, and trees block wartime vistas along Hanover Street. Still, there are many components of the landscape that can be identified as Civil War resources.
The intersection of Princess Anne and Hanover Streets in 2025 and 1864. View is looking north toward Fredericksburg’s courthouse and St. George’s Church. The courthouse, built by James Renwick in 1852, has a Gothic Revival design which is quite different from the traditional red brick/white column court houses found in most other Virginia localities.

Hanover Street is a neighborhood of handsome brick buildings. The house on the left, at the corner of Hanover and Charles Streets was a two-story home during the Civil War. Note that the third story has different bricks and simpler window surrounds. The middle photo is looking north, up Charles Street. The troops passing this point would have seen the William Street column two blocks away,

Alfred R. Waud executed the above sketch from the courthouse cupola during the 1862 Battle of Fredericksburg. The left arrow points to the Hanover Street home with two-story high columns, which is the building on the far right in this modern photo. Sedgwick’s headquarters was next door, in the middle building. The right arrow points to Federal Hill, as seen today to the right. Note that the Civil War sketch does not show any dormers. Those features were added in the 1920s, a time when wealthy individuals acquired historic homes and made them look more “Colonial.”

Hustling past Federal Hill (just inside the modern brick and iron gate) the 7th Massachusetts and the 36th New York were 960 yards from the Confederate held heights. At the bottom of the hill was the canal drainage that the William Street column also had to negotiate.
In December 1862, the Confederates had pulled up the bridge deck, which required the attacking Federals to break formation and cross single-file on the stringers. In May 1863, the Southern army neglected to sabotage the bridge in any way. The two Union regiments advancing on Hanover Street did not have to break stride as they pressed toward the Confederate-held heights.
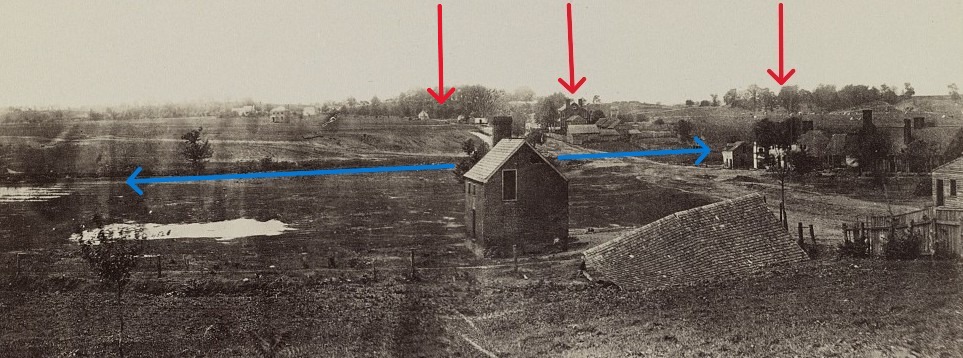
This 1864 panoramic photo was taken from the hilltop where Federal Hill stands. View is west toward Marye’s Heights. The blue line indicates where a canal drainage ran across the avenue of advance for any Union force coming out of Fredericksburg. The details indicated by the red arrows are described below.


During the night of May 2/3, several regiments took position across the canal drainage and spread out in the shelter of the earthen embankment. They were nearly 500 yards from the Mississippi riflemen waiting behind the stone wall lining the Telegraph Road. Colonel Thomas S. Allen and five companies of his 5th Wisconsin crept forward about 100 yards and deployed as skirmishers behind this stone wall. The visible houses are modern intrusions on what was then open ground.
When the Hanover Street column reached this point, Colonel Allen waved his sword, his company commanders yelled: “Charge!” and the line of battle behind the embankment joined the road column in its attack on the heights.

The road column began to take fire when the troops became visible to the Mississippi troops deployed along the Telegraph Road. There was a small cluster of buildings similar to the one here with the blue awning. The attacking Federals were about 150 yards from the Confederate line and hundreds of them were killed or wounded by the incoming fire.

Houses block the wartime vistas, so the nature of the terrain is best understood along the open streets. Four regiments burst out from behind the sheltering embankment to join the Hanover Street column’s assault. The 23rd Pennsylvania could not handle the incoming fire and fell back. The 31st New York faltered and took shelter in a swale, as troops had done in December. The 6th Maine and 5th Wisconsin pressed on at a dead run, leaving hundreds of casualties in their wake.

Stone walls along the Telegraph Road (modern Sunken Road) sheltered the 18th Mississippi Regiment as it tried to hold back the Federal assault. This photo, taken from Hanover Street, shows the only portion of the roadway that was below grade. It provided no real obstacle to the Federal attackers, who surged into this area and took on the Mississippians in frenzied hand to hand fighting. There was a minor rifle pit scooped out behind the stone wall on the right of the photo, but it could shelter only a limited number of riflemen, unlike the several rows of riflemen that could be deployed in other sections of the road.
The white building is the Innis house. The Stephens house (no longer standing) was in the trees farther up the road. The tree on the left side of the photo marks the location of a small dwelling called the Ebert house.
View looking toward Hanover Street (where the white buildings are visible behind the trees). The Innis house is on the right. The stone wall in this vicinity constituted more of an obstacle, but the Federal advance was very swift and cleared this barrier on the run. The 6th Maine and 5th Wisconsin used clubbed muskets and bayonets on the Confederate defenders in the roadway and then scrambled up a draw (to the left) to get to the hilltop.
This portion of the stone wall is a reconstruction.

Back on Hanover Street, the 7th Massachusetts and 36th New York pressed on and reached the hilltop just minutes after crossing the canal drainage. The Marye house, called Brompton, was to their left. A Confederate redoubt was to their right.
The photo to the right is taken from the base of the hill. The trees on the left follow Hanover Street. The Confederate redoubt stood where the large brick building can be seen. A supporting infantry rifle pit is no more than a faint remnant halfway up the slope, which today is called Trench Hill. It is a popular place for sledding in the winter.


The Marye house, called Brompton, as seen from the Telegraph Road.
Seizing the Hilltop
On May 3, 1863, only four Federal regiments closed in on the Confederate line where the Union had met disaster in December. The 7th Massachusetts and the 36th New York advanced in column on Hanover Street. Several other regiments waiting in line of battle on the west side of the canal drainage joined the advance when the road column reached them. When these attackers came into view of the Confederate position, they received a blast of small arms fire from behind a stone wall. The road column staggered but pressed. Some of the units in the line of battle went to ground but the 5th Wisconsin and the 6th Maine stayed with them.
Elements of those four remaining regiments crashed into the 18th Mississippi in the Telegraph Road and scrambled onto the hilltop. They spread out to capture the Confederate batteries before their weapons blew them to oblivion. The Southern defenders were stunned to also see two regiments burst onto the hilltop from its reverse slope. They were from the assault column advancing on the Confederate held high ground east of Hazel Run.
The 33rd New York, the 6th Vermont, and the 7th Maine had peeled off from their assault column, splashed across Hazel Run, and found themselves in defilade at the base of Marye’s Heights. The 33rd New York and 6th Vermont hustled to their left, sheltered by an unfinished railway embankment and then surged up the back of the hill. They emerged behind the Confederate batteries just as the 5th Wisconsin and 6th Maine also gained the hilltop. The 7th Maine had remained at the base of the hill and assisted in the capture of Mississippians trying to get away by following the Telegraph Road around the base of the hill.


The photo on the far left shows the Innis house and the draw behind the stone wall where men of the 5th Wisconsin and 6th Maine scrambled to the hilltop. This is what the attacking Federals saw as they closed in on the Mississippians in the road.
The adjacent photo is the same view but closer in. The metal fence on the right is the boundary line between the National Park and the Brompton property which belongs to the University of Mary Washington.
The Innis house, as seen from the Confederate perspective. The driveway perpendicular to the Telegraph Road (now called Sunken Road) is on National Park property and follows the draw to the hilltop. It used to provide access to a private school that once stood on the property. The private drive to the Brompton house is on the far left, slightly visible in the trees. The wood rails in the foreground are in front of what is left of a Confederate trench.


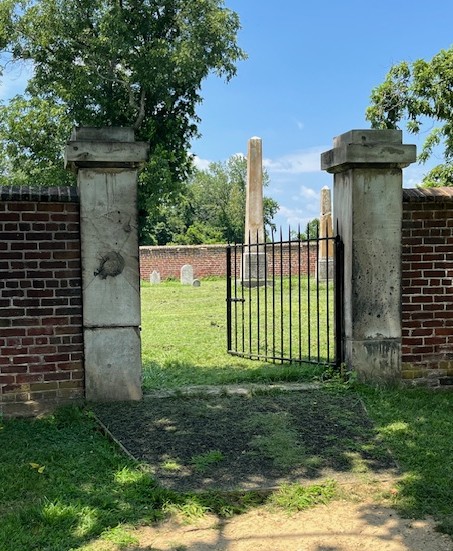
On the hilltop, east of the draw, were two 3-inch Ordnance Rifles under command of Captain Charles W. Squires. They were positioned in front of a civilian cemetery enclosed by a brick wall. That burying ground is visible behind the weapon on the right. The brick wall on the left encloses the National Cemetery, which is a post-war presence.
The second photo is the civilian cemetery as seen by the 33rd New York when they came up the reverse slope behind the Confederate artillery.
The gate post on the left exhibits the impact of an artillery round – battle damage from December 1862.

An 1864 photo shows the artillery position held by Captain Squires’ section of ordnance rifles. Marye’s Heights had been fortified with earthworks before the December battle, which were used again on May 3. These vestiges of war were obliterated when the National Cemetery was established.


A section of 10-pounder Parrott rifles, manned by crews from Parker’s Richmond Battery, were in battery where the distant trees on the left now stand. As noted above, the many earthworks in this area were flattened to prepare the ground for burials.
The adjacent photo shows the contours of the contested ground. The 6th Vermont came up the draw where the post-war cemetery wall creates an angle, which put them behind the Confederate weapons.
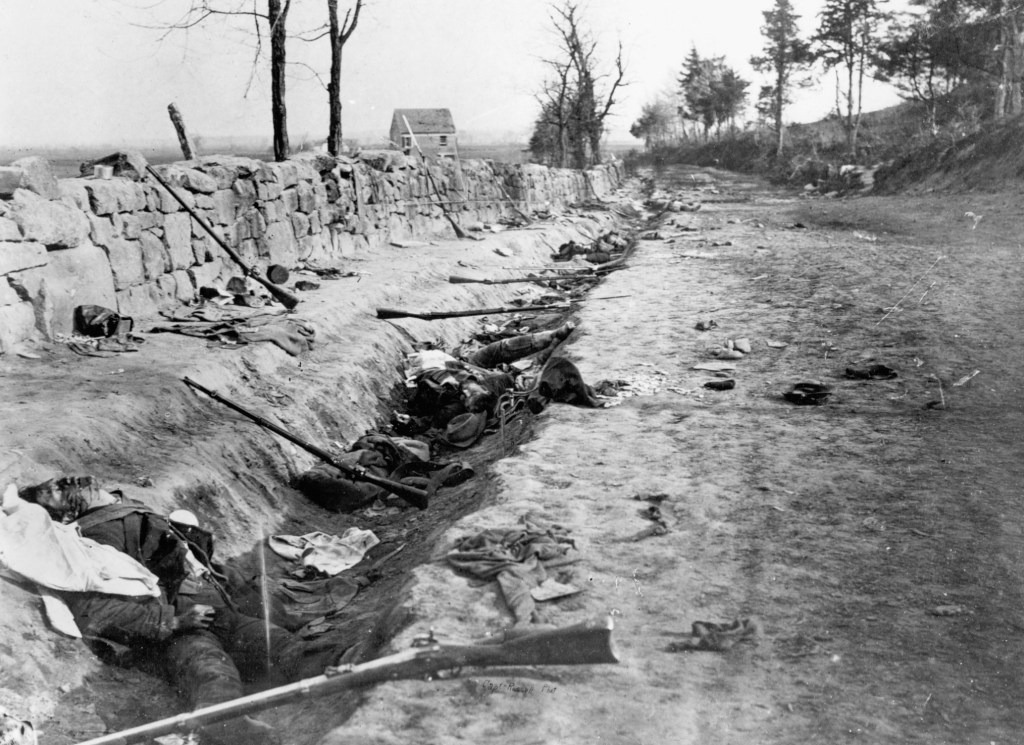

A photographer named A.J.Russell captured the image on the left shortly after the Federal assault overran the Telegraph Road (now Sunken Road). The adjacent woodcut was created to provide a dramatic illustration for publication. This one is from Volume 3 of Battles and Leaders of the Civil War. Its caption claims that it depicts the First Battle of Fredericksburg.
Note the dead soldier in the lower left of both images.

Russell exposed another image of the May 3 battleground on the reverse slope. The old road is within the National Park but not readily accessible. The red arrow points to an embankment on the east side of Haxel Run that is part of the unfinished railway that ran through this battlefield as well as through the contested ground at Chancellorsville and the Wilderness.
The modern photo shows the same location.
